The Moveable Feast Food Blog

The Moveable Feast is a Personal Chef Service that serves the Hampton Roads area of Southern Virginia. This blog is an extension of my web site www.themoveablefeastpcs.com and will go into more details about food and any food service industries. Any pictures and or recipes that are published here are all the property of The Moveable Feast unless otherwise noted.

Monday, October 31, 2005


Wines and more wines...and those darned fruit flies!
Since our first experience at Veritas was a good one, we decided to go to another winery. While we were driving to Veritas, we noticed the signs also pointing us towards the Afton Mountain Winery. It was so close we decided to drive another mile or two down the road and do another tasting. Since we attended the Towne Point Wine Festival, we were familiar with Afton Mountain Winery. The funniest thing was, we had a bottle of their Riesling in our ice chest back at the hotel. We never did get a chance to open the bottle so it's in the wine refrigerator waiting to be opened here shortly!

I figured we were on a roll so we would try something new at Afton Mountain. I really don't care for red wine so when I saw what they were offering for the tasting, I was thrilled. I cut my wine teeth on Chardonnays so I was very pleased to see we would be tasting an Unwooded Chardonnay and one that was done in French oak barrels. I have never seen a label that tells you that the wine was "Unwooded". When I tasted it I thought it was crisp and very light with no real lingering after taste. Then I tasted the oak aged Chardonnay and I could taste the oak very plainly. I preferred the Unwooded. I have no idea why. I usually drink Chardonnays that are aged in oak but for some reason the unwooded satisfied me.
So we bought another bottle of a white wine. Hubby tasted the reds and I did also but neither one of us liked them enough to make a purchase. I was happy to have the Unwooded. I will have to let you know how it tastes later. I know that we will go back to both Veritas and Afton Mountain again. We have two or three more wineries that we made purchases from when we went to the Towne Point Wine Festival. So we might hit those the next time we get a few days off.
Just as a side note: there were those silly fruit flies at Afton Mountain too but not nearly as many. If they are around in the fall I wonder what they must be like in the harvest months?? UGH.

The Days of Wine and...Hords of Fruit Flies!
I have to say that one of the most wonderful things about blogging is getting to know other bloggers. I have been lucky enough to find S'Kat from S'Kat and the Food. I was reading her site while we were playing with the highspeed connection in our hotel room and I noticed the wineries she listed on the sidebar. So I clicked on them. I saw that one of the wineries was really close to where we were and we ended up going there because S'Kat told me it was a wonderful place. So we planned a field trip and ended up at the Veritas Winery. We checked out the Veritas site and got directions. It was about a 20 minute drive. The drive out of town from the motel was a pleasant one. The air was cold and crisp and the sun was shining. It's too bad that the leaves are late changing colors this year. Our scenery up the mountain to the winery was greener than we had hoped. There were lots of signs pointing us to the winery on the tree lined country roads. When we got to the winery we noticed there weren't a lot of cars in the parking lot. We walked toward a large building that looked like a country mansion. This is what was on the porch right before you go into the main room of the winery. I saw this on another blog and knew we had to take a picture. Once we got inside the tasting room, a nice young woman greeted us and showed us a list of wines that we would be sampling. Each listing gave a description of the wine and a price. I really didn't pay much attention to the prices thinking that we were just out for a fun day and wouldn't be purchasing any wine. We tasted the whites and I found one that I really liked that I had prejudged I wouldn't ever like. My hubby tasted the reds and we both decided we like the same white and ended up buying a bottle. Price was not a consideration. We ended up buying a bottle of Sauvingnon Blanc for $14.99.
The one thing that I did not enjoy about the tasting were the hords of fruit flies buzzing around the open bottles of wine. Each bottle had a plastic spout to make pouring the wine easier. Then there was a piece of some sort of paper stuck inside the plastic spout. I am guessing that was to prevent the fruit flies from doing the back stroke in the bottles. It was very annoying swatting fruit flies away from my glass and face to taste the wine. Thankfully only one fly tainted a sample of red wine that hubby was about to taste. The poor girl was embarssed and said that the flies get really thick at certain times of the harvesting season. I have never seen or heard of this before. You learn something new everyday! Thanks to S'Kat for the recommendation! We had a great time and ended up with a nice bottle of wine to boot.

Baja Bean Co. in VA
Our very first meal while on vacation was not a hard choice. We went to downtown Staunton and walked around about 15-20 minutes when I spied the Baja Bean Co. I was tickled pink because I am from Texas and love my TexMex and Southwestern style food. We ate in the early afternoon, after the lunch crowd and before the dinner bunch. We were the only ones in the place for the longest time. I am such a push over for anything that involves beans and rice. So this was the perfect place to start our vacation. I made a mental vow not to eat any national chain restaurants while on vacation and to try and eat someplace different for every meal. Checking out the menu made my mouth water. I was hungry but I wanted to eat something that I had never eaten before. I will eat most anything so I am pretty easy to please. For my entree I had Enchiladas Popeye. This was two flour tortillas filled with fresh spinach (and it was very fresh!), monterey jack cheese and salsa topped with a tangy verde sauce and more cheese. This was also served with Baja Rice and Black Beans. The picture does not do the food justice but you can take my word for it; it was yummy. The portion size was more than I could eat and sadly I had to leave some beans and rice on the plate when it was cleared away. Since I am nuts about guacamole, I had to have a side dish of it. I could tell that the guacamole was not from a 5 gallon bucket that had been over pureed. This was fresh guacamole and it had chunks, which is very good from my point of view. Hubby agreed that the guacamole was good. I am not sure being married to someone who is not a picky eater is a good thing or not. Hubby always orders something with seafood in a Mexican restaurant. Don't ask me why, I have no idea. To me that's like eating chicken in a place that is famous for their steaks. Never-the-less he indulged his need for seafood when he ordered Enchiladas Jardin. This was two tortillas with shrimp in a garlic artichoke heart spinach cream cheese sauce and it was topped with a mild Ancho Chili red sauce along with Baja rice and grilled vegetables. I got a taste of the Ancho Chili sauce and it was fabulous. It has a really slightly spicy smokey flavor. I would prefer to have this red sauce on my Enchiladas than some plain red sauces I have eaten lately. I thought that the portions were generous and the food was good. It wasn't TexMex but instead California Mexican Baja. I wish we had eaten there more than once so I could gauge if the rest of their menu was as good as the two entrees that we ordered. I have a feeling it was. So this will require more research at a later date!

Vacation alas!
I look forward to a vacation every year. For the last year or so we have been trying to take a scuba diving trip but my youngest son's pending trip to Iraq recked havoc with some well deserved time off. When hubby works 60 or more hours a week, vacations are the highlight of our year. Last year we planned a trip to the Keys with my scuba instructor but with my son receiving orders to leave on a moments notice to Iraq, we cancelled the vacation to spend one more family Christmas together. Good thing we did. He shipped out in Jan. So we thought since he would be gone for 18 months we would plan another vacation to make up for the one we missed at Christmas. Spring and Summer both came and went with no time off. Since hubby and I love to scuba dive, we wanted take a trip to Mexico with our favorite dive shop group. We waited too late to get our reservations in and missed the November trip. Now you would think that I would be heartbroken, but being slow this time was a blessing in disguise. We were going to Cozumel. Because of the hurricane blowing through there, we were thankful that we didn't go. Then we thought we would take a leep peeping trip to northern Virginia. We knew that our son would be coming home in early November so we took the last week in Oct to get away. Is there some vacation god up there who dictates who will and will not have a vacation? If so, he must have been taking a nap when we tried this past week. As sure as we were pulling into the parking lot of our very first vacation breakfast, the phone rang. "Mom, can you come and get me? I am at the airport." What??? No, I can't believe this? We are 4 hours away. This can not be happening!! So the kid found a ride home from the airport and told us to not come home. He said that he wanted to reconnect with his friends and that he wouldn't see us much the first days so stay and have a good time. Talk about "Mommy" guilt!! Hubby and I talked over breakfast and decided that we would stay and then go home on Sunday as planned. We got home in the early afternoon on Sunday. I did not see my son until 6 pm that night and was alloted 5 minutes before he dashed out the door to a concert with a friend. It's 8:35 am and I hear from his father that he didn't come in until dad was heading out the door for work this morning. Ah, to be young and able to burn the candle at both ends! Stay tuned for more about the vacation!

Wednesday, October 26, 2005

Leaf Peeping
As you can see I live near the beach. All that sand and sun are great, but I miss the trees and leaves turning those beautiful colors. So we are off the do some good 'ole New England Leaf Peeping! Please come back on Monday so you can see what I did while I was gone. Everyone have a GREAT Halloween and be sure to take lots of pictures!

Retail Therapy
I had a client cancelation for today. I needed a jacket to wear up into the mountains here in Virginia so I decided to do some shopping. I know that some of you don't have a Burlington Coat near you but we have one not too far from my house. I went in with every good intension to buy a jacket. I wandered too far off the path and got distracted. I made a purchase, and no it was not a jacket. I have this thing about teapots and pitchers that are food related. Well actually, they look like the food itself. I almost lost my breath when I spotted a new find. I couldn't help myself! I know, I know...it's not a teapot or a pitcher but I figured out my odds of finding either one of those that looks like red chili peppers was slim and none. So I broke down and bought the cookie jar.!


No, this is not a new trend in my collecting obsession. Everyone has to set aside some of their self imposed guidelines and make an expeption to the rule. This my friends was it. Not purchasing a jacket was the only down side to this adventure that I can see. Dearest Hubby might see it another way. So I trudged on and ended up at TJ Maxx. I was looking for ? Those of you who shop in kitchen stores know exactly what I mean. It will just hit me when I see it, and sure enough it did. After the Banana Cake episode, I had to redeem myself. Redemption cost me $20. Not a high price to pay, I don't think. So now I think my collection is complete. No...wait, I don't have muffin pans. Oh no! More retail therapy. Well that's another day. So I am happybut I am without a jacket for my vacation, but warm in my heart that I have two great finds. From TJ Maxx I went down the walk way to Tuesday Morning and bought myself a box of assorted British tea bags and some Vanilla hand soap for the kitchen. So I had a wonderful morning all to myself... but alas...no jacket. Oh well...

Saturday, October 22, 2005

Play Day
I 
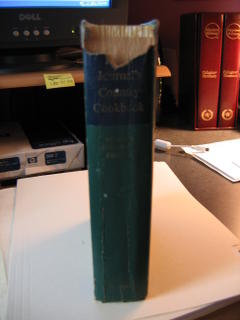
had a play day on Friday. I was inspired by all the other blogs that have been using pumpkin in their posts and that lead to the craving! I would have baked a pumpkin from scratch but I was without my car, so off to the skimpy pantry I went. Thankfully, there was an extra large can of packed pumpkin. Since I am such a freak about sweet breads (no not the organ meat kind) I had to make Pumpkin Cake. I have a the very first cookbook that I ever purchased and it's been the best book ever since. As much as I love the newer ones, this one is, "Old Faithful" as far as I'm concerned. I purchased the book when I was single and lived alone. I really didn't know much about cooking, but I knew lots about being a hungry college student. The book is The Farm Journal's Country Cookbook. The copyright date inside the book is 1972, but I think that I bought it in 1977 when I moved away from home for the first time.


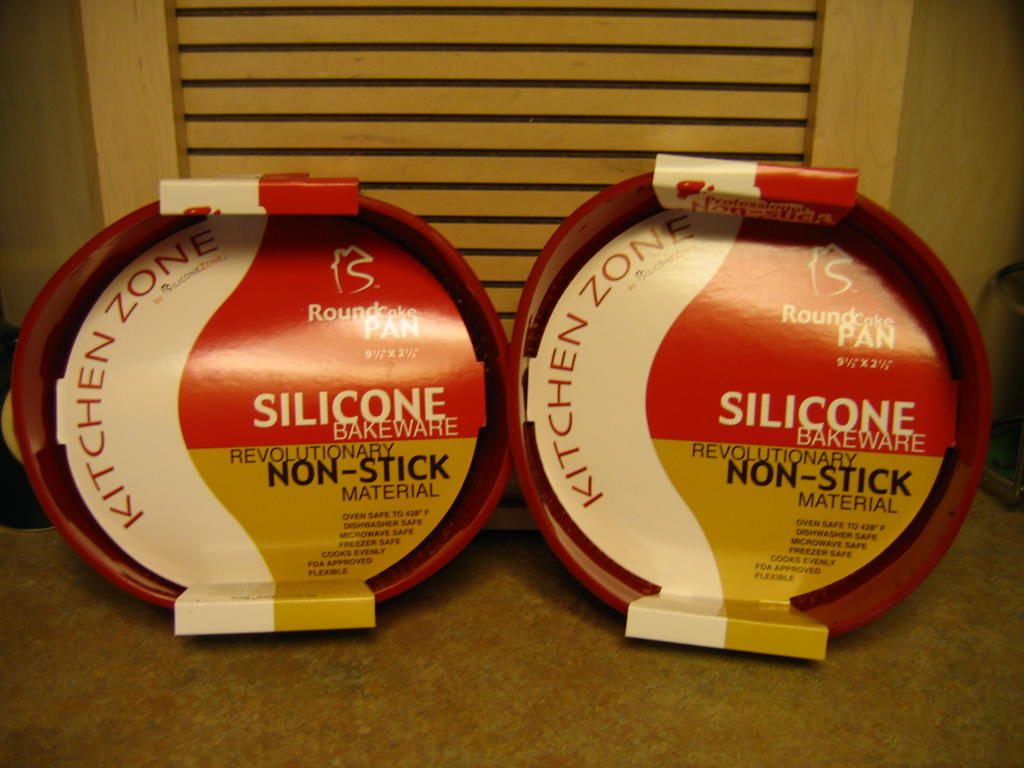
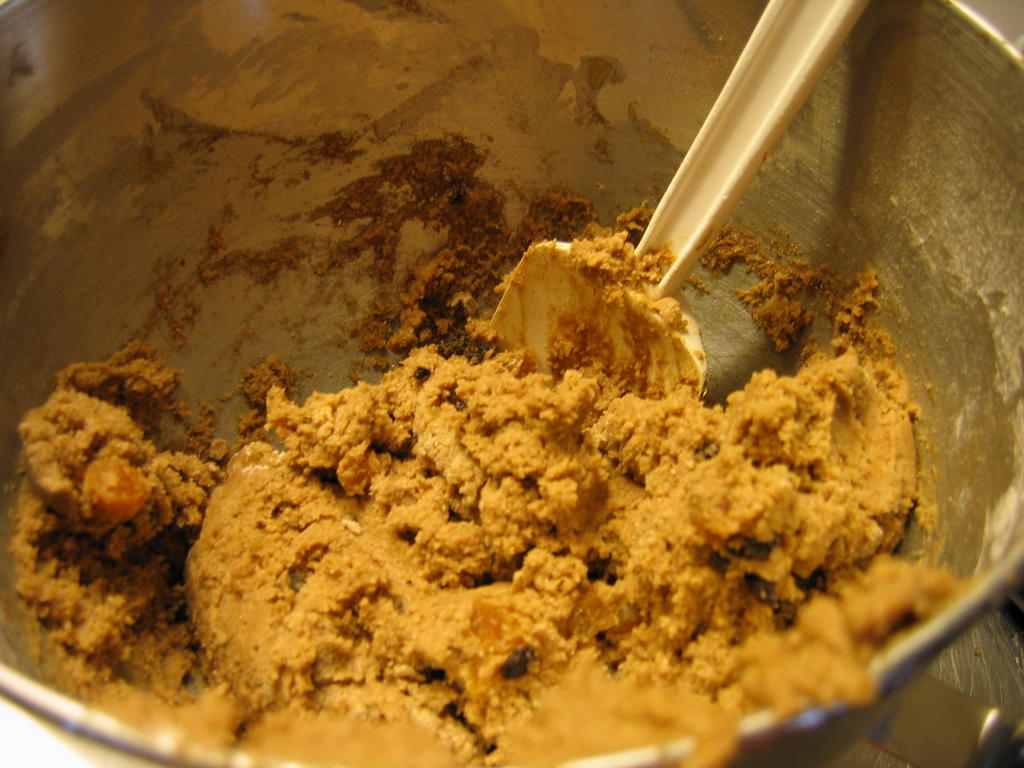
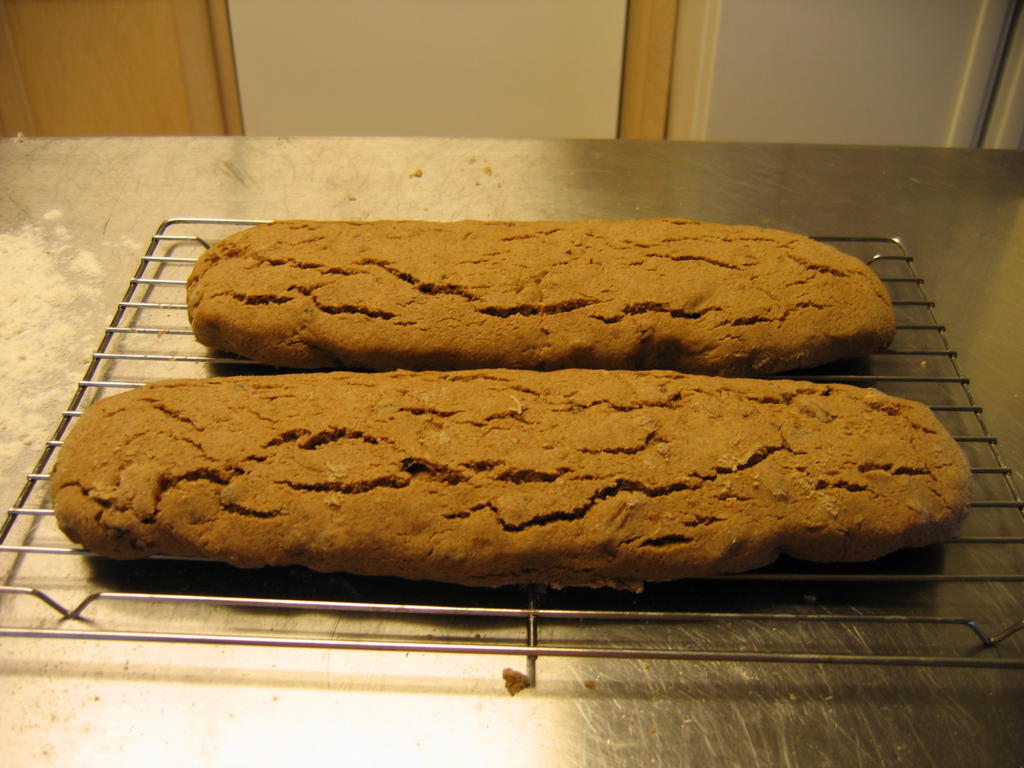
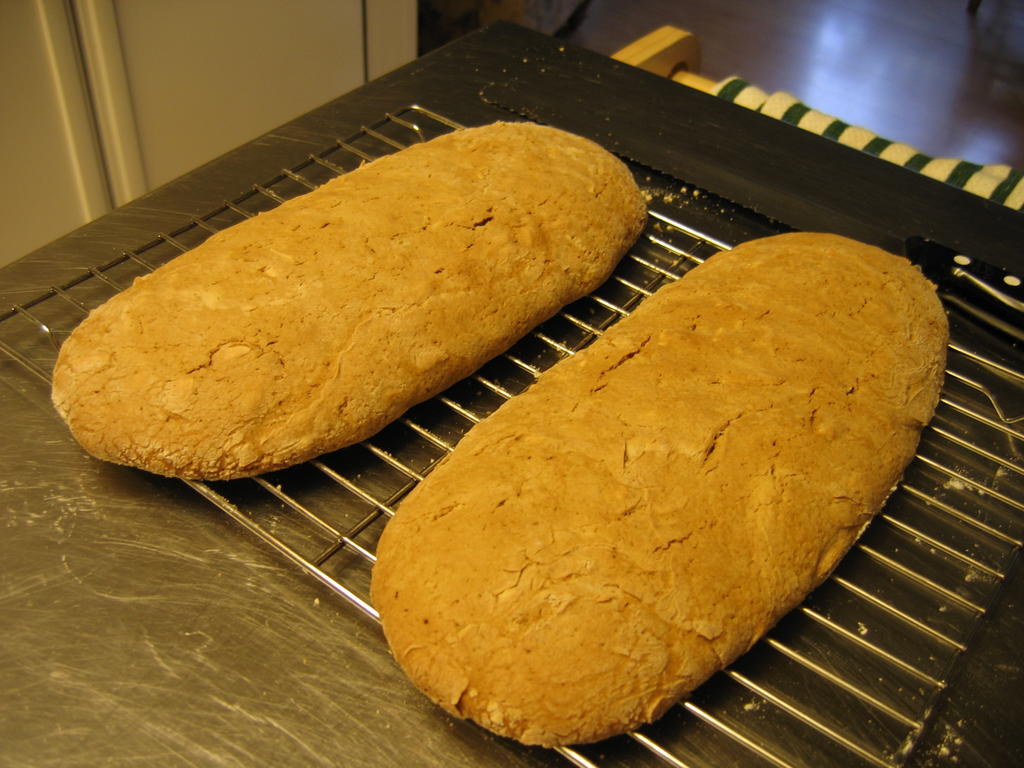
So, I whipped open my aged cookbook and looked up Pumpkin and found a Pumpkin Cake. I don't have two cake pans anymore so I used my trusty Red silicon loaf pan. I mixed up all the ingredients and got a lovely surprise at the end. There's too much batter for the loaf pan. Cripes. You know me, I put it all in there anyway thinking it wouldn't matter. UGH. It didn't but it did. I set the timer for 30 minutes and checked out it. Looked pretty good so far, but I jiggled it and it was raw in the middle so I set the timer for another 20 minutes. Checked again, still raw. Nuts on top are turning a lovely deep brown color. Opps. So I set the timer for another 20 minutes. After 90 total minutes in the oven I finally gave up. I took it out. It was buldging on the sides and it looked pregnant. What a site.


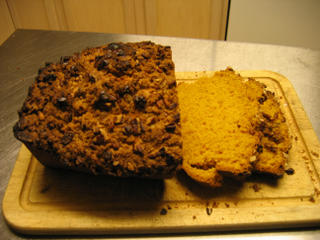
I was really pleased with how large it was but the nuts on top were well past "lightly toasted". So I cut that bad boy up, slathered it up with some butter and ate a slice. Now where is Michelle when you need to have someone to gossip with, drink tea, and eat stuff from the blog???

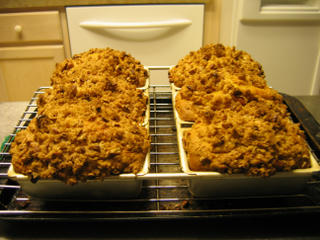
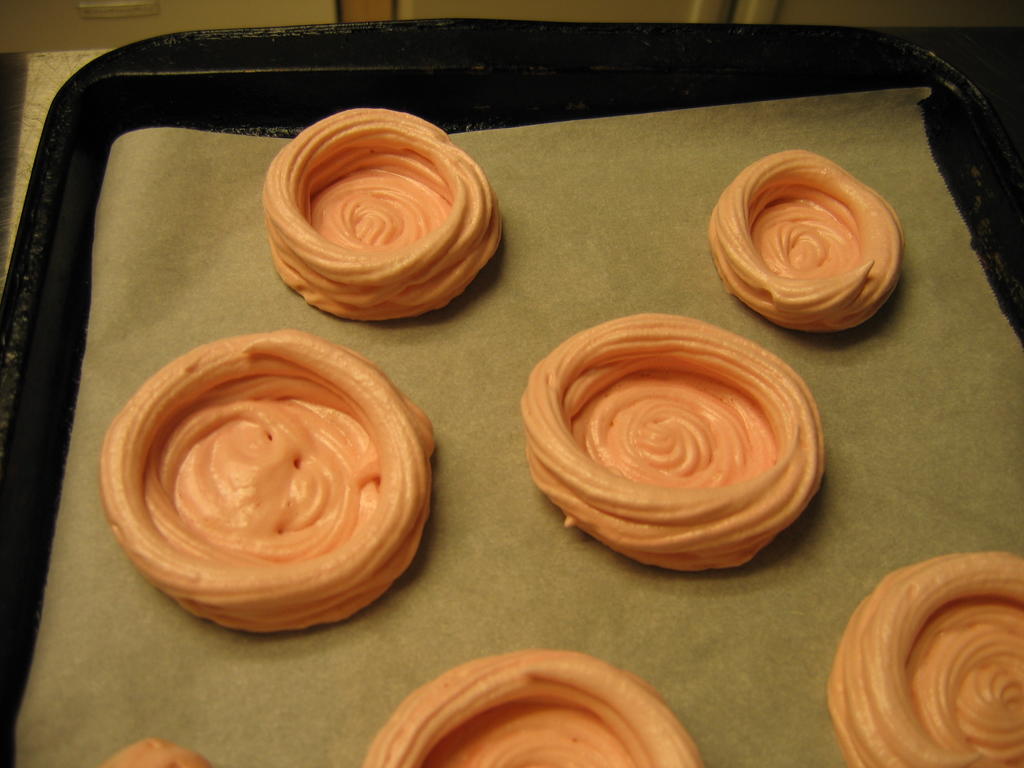
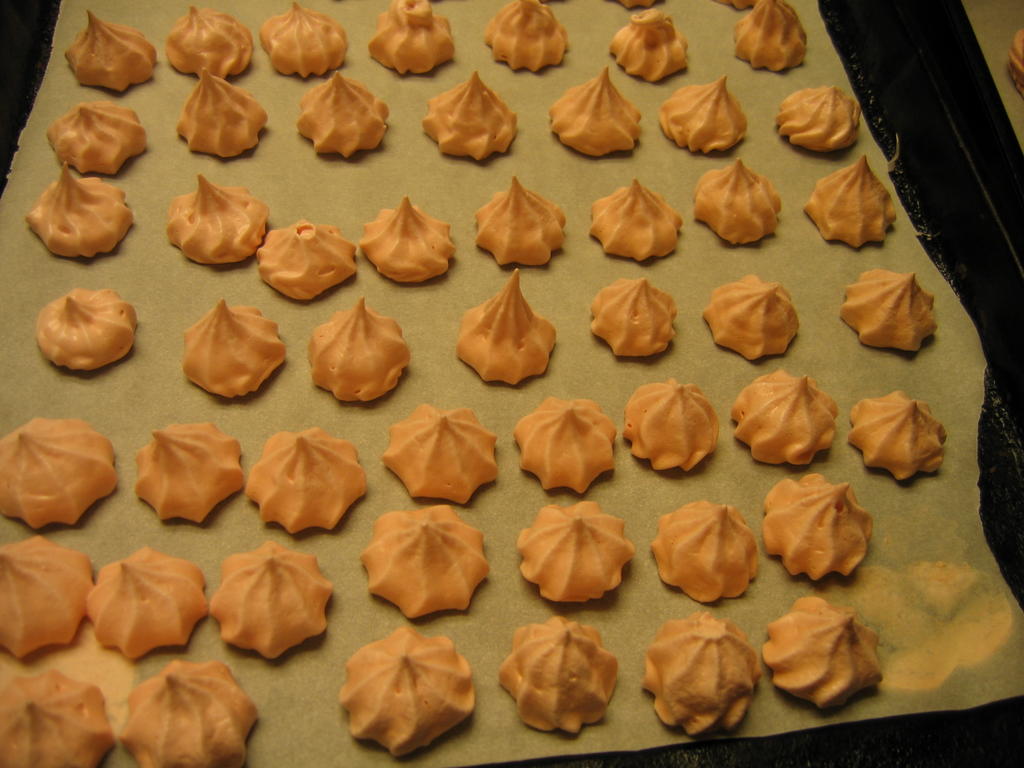
Then being the brilliant person that I am, I mixed up another batch of Pumpkin Cake and this time I learned from my mistakes! I baked the batter in my Wilton mini loaf pan set. It bearly fit but as you can see from the photo, but they turned out nicely. So making a mistake turned out well. Now let's see about that chicken and the burning silicon pot holder episode! LOL!

Pumpkin Cake
1/2 cup shortening (butter will do well also)
1 cup sugar (I used the Splenda Sugar for Baking and that reduced the amount to 1/2 cup)
1 cup brown sugar (firmly packed)
2 eggs, beaten (give me a break, I just broke them open and tossed them in!)
1 cup cooked, mashed pumpkin or winter squash
3 cups cake flour (I made with AP flour)
4 tsp baking powder
1/4 tsp baking soda
1/2 milk (any kind will do-I used fat free Lactaid milk)
1 cup walnuts chopped (I did actually use them)
1 tsp Maple flavoring (I didn't have any so used the 'ole stand by-VANILLA)
Cream shortening (or butter) and slowly add sugars, eggs, and pumpkin.
Sift together flour, baking powder and soda (get a grip! I threw in the baking powder and soda and then added one cup at a time into the Kitchen Aid-if you add more than a little at a time, that stuff goes all over the place!) then add alternately with milk to creamed mixure (yet grip again! I put the milk in the beginning with all the other wet ingredients).
Fold in walnuts and Maple Flavoring (okay so I don't really follow a recipe-add this stuff when you feel like it)

This is where I got stupid, I mean daring...
Pour into 3 (count 'em 3) 8" greased round layer cake pans. Bake in a moderate oven (350) for 30 minutes. Cool on racks. (What a laugh)!

I took a hand full of more brown sugar and tossed that with a hand full of walnuts and mixed them together in a bowl. After pouring the batter into the loaf pan I sprinkled the mixture on top. Now, if you make this a layer cake it really shouldn't take 90 minutes. If you decide to make this a loaf cake, then you really need to be smarter than I was and use two pans. If you do the minis that aren't connected together, it might take 7 pans. So please save yourself lots of time and don't make the same mistakes, I mean experiments that I did.

Happy baking!!

Friday, October 21, 2005


WCB #20
Thanks to Eat Stuff for hosting the Weekend Cat Blog #20. It's our first time.
Bailey

"I swear, if you stick that camera in my face one more time I am going to leave you a fur ball on your side of the bed for in the morning!! Go away, I am resting... "

WDB #6
Thanks to Sweetnicks for hosting us!
Sadie (Pointer posser)
"You rang mum? I am a pointer not a Doxie!! I swear I saw a squirrel!!"

Sad News
I got some sad news this morning. For those who have been reading this blog since I started in Sept, might have remembered reading a tribute I did to one of my clients, Mrs. Evans. Sadly Mr. Evans passed away in the wee hours of this morning. I want to extend my deepest sympathy to the whole Evans family for their loss. Mr. Evans had quite a wicked sense of humor and I enjoyed our banter back and forth when I got to their home to cook. He will be missed.

Wednesday, October 19, 2005


Simple Asian Food

I love Asian food. I enjoy going out to eat it but only the food that I might not make at home. I haven't mastered Sushi, but maybe someday I will. The other day I was in the grocery store and saw a package of reduced ground pork. I don't usually eat ground pork but this is the exception. I snagged the package and froze it knowing what it was meant to be. A few years ago (okay about 20), I bought West Bend 6-Quart Electric Wok (WHAT WAS I THINKING?). Being a newish homemaker and mommy, I thought I was some kind of a gourmet in the making. Little did I know that I would actually graduate from culinary school way later in life. The wok came with a little cook book (Madame Wong's Long Life Chinese Cookbook) and I think I tried most everything in there while I was hot to use that new toy.

One of my most favorite quick things to make was Shao Mai. The book says it's an appetizer, but we eat them as the entree. Who says an entree has to be a large cut of meat? Isn't there a saying that wonderful things come in small packages? Well these are it.

I mixed up all the ingredients and then spread out the won ton wrappers in a line and started pinching small amounts and putting the mixture in the middle of each won ton. Then you just pinch the won ton until you think it's pretty much closed. Most will stay closed depending on how stuffed you make the wonton. If you overstuff, they tend to pop open when cooked.


Then you line the steaming basket with a wet paper towel, bar mop or small kitchen towel. You load the steamer with the little bundles and close the lid. The same principal applies to steaming as to cooking rice, NO PEAKING BEFORE IT'S TIME. I know it's hard, but resist. You will be rewarded before it's over.


Be sure that what ever pot you put the steamer over, it's got boiling water going. It speeds up the process instead of starting with cold water and having to wait for it to heat up. The Shao Mai, gets sticky when steamed so you will need to keep just a little space between each one. They are a bit tricky to separate once they have melded together, but they still taste great!

Shao Mai

1 pound ground pork, ground beef or chopped shrimp

1 TBS sherry

2 TBS light soy sauce

1 scallion, chopped fine

1/2 tsp salt

4 water chestnuts, chopped fine

1 tsp cornstarch

24 won ton wrappers

In a bowl combine meat or shirmp with all other ingredients except the wrappers. Mix well.

Put 1 TBS of filling in center of each wrapper (if you buy the same won ton wrappers, it's more like 1-1 1/2 tsp of filling per). Gather sides of each wrapper around filling. Squeeze center gently. Leave edges of dough shirred.

Line the steamer tray with wet cloth. Place Shao Mai on tray over boiling water. Steam for 20 minutes.

After steaming, remove Shao Mai to platter to prevent sticking. May be served with red wine vinegar or a combination of equal parts red wine vinegar and light soy sauce.

May be prepared completely in advance and can be frozen after the second step and then steamed from frozen-steaming will increase from 20 to 30 minutes.


Tuesday, October 18, 2005

My First Meme!
I was reading the posts on my blog and almost fainted when I saw that I got tagged for a Meme. It's my very first one and I am just like SoCalFoodie when I say I was giggling like a kid. I have read others but to be included well, I feel like it's a right of passage! Too wonderful.

1) Show us your kitchen ( a picture) and tell us what is it about this place that reflects your own personality.
This is the most used corner of the kitchen in my house. The appliance garage houses, the immersion blender, mini chopper, a Kitchen Aid mixer, toaster and a hand held beater. That door gets a work out. The food scale is always out to remind me to weight my food so I can continue to lose weight and remember what a "normal" portion size is. I like things out and handy to reach so there is a lot of organized clutter.

2) Open a cupboard (the one you feel to open), take a picture and tell us what we see.


These are items that get stored and used on a regular basis. I try not to keep to many canned items but sometimes you just can't be without them. I bought Tupperware back in the mid to late 80s and have used it ever since. It is square and modular so it stacks and stores nicely. They are pretty much see through so if you lose the sticky label you can guess what's on the inside (except for sugars).
These are the two shelves down from the last photo. I love my Splenda since I don't digest real sugar. I use the regular Splenda for my daily pots of tea and the baking Splenda blend for everything else. My pantry isn't very interesting, just cluttered!

3) Present us your favorite kitchen-based household appliance.
You would think that since I am a working chef I would pick some fancy piece of machinery but I love my toaster. I just open up the appliance garage and pull it out and plug it in. I use it 7 days a week. I wanted to put a second piece so see below.

This is the only other piece of kitchen equipment that I use every single day. I usually have two or more pots a day. This was purchased for a good price and it sure gets a work out!

4) Take out the ingredients you like the most, the ones you always keep stored. I love the fact that I can digest the Splenda. It has saved my coffee and tea habits. I changed my salt from table salt to Kosher and have never looked back. I keep a huge box of it both for my business and personal use. The black tin in the middle is my Harney and Sons tea. I love the Sun Dried tomatoes and my dried plums. Then there are the staples of Canola oil, Olive oil and Balsamic vinegar.

5) My little steel friend: present us to your favorite cooking/baking recipient.

I don't have a lot of these things but I think who ever invented silicon baking anything is a genius. I hate scratched, rusted and dented baking pans. As soon as I can, there will be a round cake pan added to this. I already have 2 sizes of the silicon baking pan liners. I love them. So I think that's it for the Meme.


Monday, October 17, 2005


How I Spent My Weekend-Part 2
Besides, driving to DC to teach the ServSafe class, my local Chapter decided to attend the Town Point Virginia Wine Festival. We had a great time tasting wines, eating, people watching and visiting. The weather was very sunny but a bit blustery for my taste. The black flies didn't seem challenged when they heard what the menu was!

Early Sunday morning I made food for the wine tasting. I wanted to do something that wasn't the "norm" for me. So I made a HUGE wheel of Brie baked in puff pastry with an Apricot and Rosemary Chutney and a Smoked Salmon Mousse. I also brought two sliced up apples, a bunch of red grapes, a tin of huge whole wheat crackers, a spare container of the Apricot Chutney and a baguette of bread I brushed with olive oil and baked in the oven. I loaded everything into this really great picnic basket I bought in New Hampshire last year while on vacation. This was my second time getting to use it, so I was really excited.
This picture is of the wheel of Brie and the Apricot and Rosemary Chutney on top. After this picture was taken, a second piece of puff pastry was put on top and pinched all the way around. I brushed the whole wheel with egg and popped it into a 350 degree oven for about 15-20 minutes. Then it happened; that familiar smell. Oh, no something was burning! Not again. First that chicken, now this???? UGH. I opened the oven and started to laugh only because I wanted to CRY. My pastry had two blow outs and cheese was oozing everywhere. It looked like the devil. I can sit here and laugh now, but believe me seeing that $40 piece of cheese dripping over the side of the sheet pan was not funny by any stretch of the imagination! I took the wheel out of the oven and let it cool. Since it was too big to take to the Festival I cut two wedges and put them into containers and the reminder went into the refrigerator. Sadly, it is still sitting there and I have no idea how to use up the rest of it. The Smoked Salmon Mousse and Apricot Chutney turned out much better than the Brie, thankfully! Everyone loved it and we ate well.


How I Spent My Weekend-Part 1
I have never been much of a Science person but got more interested in the Science part of my industry when I took a food sanitation class while attending Johnson & Wales University in 1996. I really was not thrilled about having to take this class but it was required. Once I took the class I realized how important this class was to me personally and for my culinary career. I think it has improved my practices at home and then that carried over to the homes of my clients.

I grew up in the 60s and my father was in the military. I remember going to the commissary and loading carts with bread, milk, meat and other misc. items. We had a regular refrigerator at home as well as a second freezer. That second freezer was full of various items from the trip to the commissary. I never really gave it much thought about what had been frozen and how it had to be thawed in order for us to eat or drink it.

I always remember a rock hard frozen package of hamburger sitting on the counter or in the sink for endless hours to thaw before it was cooked in the evening. Paper half gallon containers followed suit in the sink. Most of my adult life I practiced what I had seen as a kid growing up. However, after taking the ServSafe class offered by the NRAEF (National Restaurant Assoc. Educational Foundation, this learned behavior has been through some mightly big changes. I still freeze milk, cheese, butter and all kind of meats and vegetables, but their thawing processes have done an about face.

Since becoming a CPC (Certified Personal Chef) I realized how I could help others in the Personal Chef industry change their old habits and develop newer and safer practices when it comes to their personal habits as well as their cooking habit for their clients. I have taken the ServSafe test three different times over the last 9 years but the last time was the keeper. I took the test to become a Certifed ServSafe Instructor. I have the privledge of teaching other Personal Chefs and I can see that some of this information is news to them as it was to me when I took the class the very first time.

I spent this past Saturday (15th) doing an 8 hour class in the home of my friend John Bauhs. John is the President of the DC Chapter of USPCA. I offered both the Maryland and DC Chapters a chance to take the class this past Saturday. There was a class of 7. I would like to say how proud I am of the group for showing the willingness to learn new habits that can prevent them from making mistakes in food sanitation.
Left to right bottom row: Jerree, Roberto, John.
Left to right top row: Usha, Bobo, Cal and Lorraine.

I know you all did great! Thanks about caring for your families and clients by taking this class! You were a SUPER group.

Friday, October 14, 2005

Out of Town
There will be no posting from Friday, October 14 until Monday, October 17. I will out of town teaching, but will have pictures and more posts when I get back. Please come back on Monday and visit again.

Wednesday, October 12, 2005

I Love Bacon!!!
I am a true Southern girl through and through to the bone, except for my Texan accent which disappeared years ago. You can take the girl out of the South but not the South out of the girl really applies to me! I was raised on bacon and eggs every weekend as far back as I can remember. There was nothing better than a crispy piece of freshly fried bacon draining on a paper towel next to the stove. Even now as an adult I can't pass up bacon. When I cook breakfast on Sundays (the only day I allow myself to have bacon), it bearly makes it to the plate before I have eaten half of what I just fried up. Thankfully my hubby sleeps later than I do and will never be wise to the fact that I fry up 8 slices and between our two plates, there are only 4 slices to be eaten. Wonder what happened to the other 4 slices?????? I will never tell and since I am not going to let him proof this post, hubby will never know!

When I was cooking up the Butter beans for dinner, I used some thick slices of bacon that were purchased a few days ago to put in the cabbage and then in the green beans. I will not be eating bacon this coming Sunday and was afraid it would go bad before I could do the Sunday breakfast thing. So I heard about this tip from someone about how to save your bacon from going rancid. I have never done this before so I thought I would give it a shot and pass this on to all of you other bacon lovin' folks.

After you open the package and use what you are going to use, freeze it. No, not the usual way. Take a small sheet pan and line it with wax paper. Then take each slice of bacon and curl it up and set it on the pan. Pop that into the freezer and wait for the rolls to completely freeze. Then take the rolls off of the pan and put them into a freezer bag.
When you are cooking and just need one slice of bacon, you can pop that little frozen roll out and use it.
As far as I can see, you can take the bacon out to thaw for a few minutes and still use it for frying. Just to be on the safe side, I would take a paper towel and blot off any access moisture before frying. So this is a quick and easy tip to save yourself from rancid bacon.

Butter beans/Lima beans?
I had to drive 45 minutes from the house today to work. There is this really great Farm Market store called Bennett's Creek Farm Market. I got introduced to this place by a former Personal Chef, Jackie. I hadn't been there in over a year until this client hired me. I drove out there and found the market all over again. Now when I drive home every other week, I have to stop there and buy something, anything. My car just knows where to go and it does. Today I was really thirsty and had to get something to drink for the 45 minute drive back home. I don't usually drink soda but it sounded really good to me for some reason. As I was about to fill up my cup near the open refrigerator display case, I saw the sign, "Butter Beans, Freshly Shelled". There were rows of little plump clear plastic bags all neatly lined up. Each bag had about a pound in it. You could see the small pale green beans inside the bags.
Inside my head I could hear all of you saying, "Buy local produce in season". So knowing that all of you are much more informed than I am about this seasonal stuff, I did as you told me ; I bought them! Right now as I sit here and type, they are in an All-Clad pot with two thick slices of bacon and one medium sized onion simmering away. Being the dutiful wife that I am, I had to call the hubby and tell him what I bought. His excitement was a bit more scaled down than mine, until I said, "I will make them for dinner tonight". Yeehaw. If you knew my husband's temperment you would know his excitement meter about my food finds peaks at a 3 on a scale of 10. One of these days I am going to peg him out at 7 and then die happy.

Monday, October 10, 2005

Recovery is everything!
I know that is a cheesy title but I think I did this very well this weekend. After my poor chicken got blackened without me...paying attention I had to recover my cooking dignity! Nothing like posting your burned chicken on the blog! lol! So I got a brain storm Sunday morning. I picked the rest of the meat off the bones and cut it up. I had thought about the usual chicken salad but then I remembered an Oprah show where she talked about eating the most amazing Curry Chicken sandwich. Ah ha! That's it. Curry Chicken Salad. YUM. I have never made this before so it was a guinea pig recipe for the hubby. I looked around to see what I could throw in the bowl besides the chicken. Well I would need a base; light mayo. Then I needed some other interesting "out of the box" element to throw in there. Let's see, raisins? No too...predictable. Currents! So let's see... we have left over blackened chicken, light mayo, currents and then I needed some chopped green onions, and half an apple, s&p, and finally the curry powder. Not too shabby for trying to recover from that horrible chicken incident! Sorry about the darkness of the picture. I am still playing with the camera but take my word for it; it was yummy. Since sometimes a sandwich is just not enough carbs, I added one more thing to the lunch line up. When we were at the Farmer's Market the day before I bought some tomatoes that were labeled "Traumatized". The description cracked me up and who could resist buying them after that?

Tomato, Goat Cheese and Herb Tart-Serves 4 or more
2 tsp rosemary, fresh, chopped
2 tsp basil leaves, fresh, chopped
2 tsp thyme, chopped finely
2 tsp parsley, flat leaf
1 large garlic clove, crushed
salt and pepper to taste
1 large bay leaf
1 TBS Dijon mustard
1/3 cup olive oil
3/4 cup Gruyere Cheese, grated
12 Roma tomatoes, sliced
1 large fennel bulb, finely chopped
1/2 pound Goat cheese, cut in thin slices (as thin as you can because it's a bit tricky. Dipping the knife in warm water helps if the cheese is really cold)
1 16 oz. package pie crust, all ready made (you can make your own instead)

Combine all the herbs and olive oil plus the bay leaf in a jar or bowl and leave overnight if possible or at least a few hours.
Preheat oven to 375 and put a baking sheet in the oven.
Put the pie crust on the pre-heated baking sheet and spread the mustard on the pie dough. Then sprinkle the Gruyere cheese evenly on top of the mustard. Cover the whole shell with alternating sliced tomatoes and pieces of the Goat cheese in concentratic circles. Brush the top of the tomatoes and cheese with the olive oil and herb mixture. Do not saturate or it becomes oily and over wet while baking. Bake for 35 minutes until it is heaving, brown and bubbly. Remove from oven and brush with remaining oil (you may not have to do this) and let cool for about 10 minutes before serving.

I would love to give credit for this recipe but for the life of me I can't remember where I got it! I searched through about 5 cookbooks but never found it. It could be Cooking light, then again not.


Sunday, October 09, 2005

Rain, Rain, go AWAY!
I have to say that since I have been doing the blog I have become more acutely aware how I DON'T support my local Farmer's Market. I have always known it's there but just never made the effort to become a regular visitor. The only two excuses I have are laziness and bad habits. Since my husband was career Navy, we have always shopped at the Commissary. This habit was engrained (for all of you spelling hounds, I looked this word up in the dictionary and it said I could use engrained or ingrained. So I just picked one) in me from growing up Air Force and then it just carried through to the Navy way of life for me. Some habits are just hard to break, especially if you never even make the effort to do so.

When we went to the Farmer's Market a few weekends ago, I marked it in my PDA that yesterday was the Fall Festival at the Farmer's Market. I waited for hubby to get home from work and we left in the pouring rain. When we got there it was pretty much deserted except for a couple of die hard pumpkin vendors set up in the parking lot. The display was so beautiful. No, I didn't take a picture but will another weekend when there is no rain. We walked around the market and found out the whole event had been canceled, which really burst my bubble. I was really to throw myself into the whole pre-fall celebration.

There is a little cafe in the market called County Cafe. We peaked in the windows that they weren't very busy so we went in for some lunch before all the food shopping began. I looked up above the counter and there was a huge chalk board with the specials listed. Yesterday's special was, Chicken and Dumplings with a piece of cornbread for $5.99. I could hardly resist with the rain outside and the darkness of the day.
I have to say the dish was pretty good. It had generous chunks of chicken and huge pieces of carrot (which I don't usually put in mine). It filled the bill. I was a bit disappointed that I got a biscuit instead of the promised slice of cornbead. I looked around and saw that others had the same order and the cornbread was absent, so either they ran out or it just didn't happen. Either way, the Chicken and Dumplings were filling as well as the biscuit on the side with a large glass of really sweet tea.


After eating we wandered around the market and I spotted some items that I wanted to use on the weekend and the following week. I have a very busy week and planning ahead means no fast food runs. I am trying to eat better...most of the time! So now my refrigerator is full of veggies again and I felt inspired to cook last night. Hubby bought me a whole chicken and I thought baked chicken with boiled cabbage and red potatoes sounded good along with a side of snap beans, again with the red potatoes. My chicken started out well but I made the grave mistake of coming into the office to catch up on some other blogs. Then I smelled it! UGH.
My poor roasted chicken! I set the oven at 500 for 30 minutes so I could crisp the skin, which it did nicely, but then I came up here and got distracted. I smelled something burning and ran down the stairs. No smoke was to be seen only that horrible odor of, "Oh crap, I burned my dinner!" I know others have smelled this same smell! Thankfully, the cabbage and green beans did well on low so dinner was not a total loss. The chicken was good and I was proud of myself for using Farmer's Market produce. I am a work in progress.


Saturday, October 08, 2005


WDB #4
Thanks to Sweetnicks for hosting our poochie pics.
I couldn't resist putting some pictures of my eldest pooch since Mark at ReMARKable Palate did. Edward had been reading when I interrupted his book. Now that he is 8 he needs the glasses just for reading, really!

Thursday, October 06, 2005


In the Pink
I was looking at some other blogs earlier this week and found one that I really thought was such a great idea. I have been working on that challenge all week. I found this challenge at la dolce vita and wanted to enter my Pink contribution. I have had this recipe for a few years when I first found it in Cooking Light magazine. I used it in the orginial form several times to some great reviews by my clients. So I thought that this would be an easy recipe to alter for the Pink food challenge. So here is my entry. I so enjoy showing the process of making things so there will a lot of photos here. Please scroll down through the process so you can see it from beginning to end...no peaking before it's time! The first thing that I did was to beat the egg whites to stiff peaks. Since I chose this recipe for the possibility of being PINK I added some food color on a tooth pick to the egg whites. When I did this, I wasn't exactly sure if the pink would show up. I took this picture to show you the contrast between the red Kitchen Aid and the pink. Then I took a piece of parchment paper and drew little circles to fit the size of the pan. I loaded the pastry bag with a star tip and then piped around the circles filling in as tighly as I could. Then I pipped up around the outside of each circle to make a low sided cup as shown on the sheet pan photo.
Then it bakes in the oven for 90 minutes or so. Since I made smaller circles than the recipe called for I did set the timer for 60 minutes and then test them and decided to go the full 90. After the meringues rested in the turned off oven for 30 minutes, I took them out and put them all into a zip lock bag. I tried this last week and went to bed with the sheet pan sitting on the counter. When I woke up the next morning and tested them, they were soggy. So put them in a zip lock bag right away. You can even assure that nothing happens and wrap them in foil, then put them in the plastic bag. Either way, you can't leave them out over night or even for just a few hours or they get really soft. I had so much meringue left over that I made little star cookies too. Then I made the filling and spooned that into the little cups and topped them with the berry mixture.
This is a dessert that is meant to eat the moment you spoon the berries on top. The juice will soak into the bottoms and they get soggy. So if you use the recipe for a party, you can do the meringues in advance and assemble and eat on the spot. Meringues with Fresh Strawberry and Chocolate Mascarpone
Cooking Light magazine
2 large egg whites (room temperature)
1/4 tsp cream of tartar
1/2 cup sugar
1 1/2 TBS sugar
1 TBS cocoa powder, unsweetened
6 TBS Mascarpone cheese, softened (or about 3 ounces)
1 tsp milk, nonfat
1/4 tsp vanilla extract
3 1/2 cups strawberries, fresh, about 1 1/2 quarts quartered
1/4 cup sugar
Directions:P
Preheat oven to 225 degrees.
Cover baking sheet with parchment paper and draw 6 4 inch circles on paper. Turn paper over, secure with masking tape. Place egg whites and cream of tarter in a large bowl; beat with a mixer at high speed until foamy. Gradually add 1/2 cup sugar, 1 TBS at a time, beating until stiff peaks form (do not underbeat). Divide egg white mixture evenly among the 6 drawn circles on baking sheet; spread to fill circles using the back of the spoon.
Bake at 225 for 1 1/2 hours. Turn oven off; cool meringues in closed oven for 30 minutes. Carefully remove meringues from paper. Cool completely.
To prepare chocolate mascarpone, sift together 1 1/2 TBS sugar and cocoa. Combine, mascarpone, milk and vanilla in a small bowl; stir just until combined. Stir in cocoa mixture.
To prepare berries; toss 1/4 cup sugar and let stand 15 minutes.
Place 1 meringue on each of 6 plates; spread about 1 1/2 TBS of mascapone mixture on top of each meringue. Top each serving with about 1/2 cup strawberries mixture. Garnish with mint spriges.
Yield: 6 servings.

Up for the challenge!
I was flipping through some other food blogs this am and found one (Seriously Good) that really made me laugh. After laughing in horror I decided to pick up the camera and do my thing! Below you will see my kitchen. I did wash the few dishes I had in the sink and wipe the crumbs off the what little counter space I have. We have lived in this house since 1993 and it has been the proverbial "money pit". I had a friend in culinary school who was a kitchen designer for a local boxed hardware store. He convinced me that we should rip out the old "builder grade" cabinets for something more wonderful. $4,000 later we had nice white washed cabinets, new counters, an under cabinet Lazy Susan and an applicance garage. Now, I am thrilled to have those old dark cabinets gone, but we made some really amateur mistakes. I was so excited about having two new items in the kitchen, that I hadn't thought about what kind of long term impact it would have on the over all convenience of cooking here.


First I hadn't thought about how much space the appliance "garage" would take up. I had so much more counter space before . It cut my counter space down by 1/3, but the storage space tripled. Usually that wouldn't be a problem but when you have a small kitchen to begin with it's a HUGE issue. The second mistake we made again involves that same corner of the kitchen. When we opted for the Lazy Susan, we gave up two drawers; TWO. So now I have one very skinny drawer on one side of the stove and a large one on the other. That's it! I got so excited about the applicance garage and the Lazy Susan I didn't give any thoughts about losing drawer space. So...we had to buy a rolling cart to put in the middle of the kitchen that had two drawers in it and an expandable work surface. Thank goodness we found the moveable island. It has been the best investment in the kitchen since remodeling. I can knead bread on it, do pastry and unload groceries. The next time we remodel, I will be sure to insist on having more than two drawers! Live and learn!

I enjoyed looking at all the other kitchens. I see that I am operating in the same amount of space as everyone else. Well, they say good things come in small packages. This example could be the very thing they are talking about!

Monday, October 03, 2005

Bake Me Into the Fall

There is no other season I love more than fall. I love to crank up the oven and do my thing. It's like certain things go hand-in-hand; baseball games and hot dogs, Thanksgiving and a turkey, Christmas and sugar cookies. For me fall and baking go together like a hand in a glove. I don't bake any other time of the year if I can help it. It's just too hot turning up that oven when the heat index is 105 here. So I cut and rip out ideas for things to bake all year and the first day the temperature goes under 70 I head for the pile of recipes and get going. Today I needed something to have with my coffee and tea. I got introduced to Biscotti by my friend Angie and her family. We were living in PA and were invited to visit during meal time. While we were there Angie's grandmother baked some Biscotti. I was smitten. Can you be that way about food? You betcha! So today I made two different kinds of Biscotti. The first recipe was Friuted Nuts Bars. Then I made Espresso Biscotti. I did make some changes to both the recipes because I never seem to have everything I need for any recipe when I get the whim to bake. Since these things are mostly spur of the moment, that explains the recipe alterations. Both recipes come from my favorite little book all about Biscotti, Biscotti written byLou Seibert Pappas.

Fruited Nut Bars

2/3 cup walnuts or pecans (I used pecans)
1/2 cup butter
1 cup light brown sugar, packed
2 eggs
1 tsp vanilla extract
2 cups whole wheat flour
1 1/2 tsp baking powder
1/4 tsp salt
2 tsp cinnamon
1/4 tsp cloves, ground
1/4 tsp allspice, ground
3/4 cup chopped figs, dates or dried apricots ( I only had four dried apricots and then threw in some currants-unmeasured) I don't advise using the currants . When the Biscotti came out of the oven the second baking, they tasted a little on the burned side.
Place nuts in a shallow pan and bake in a preheated 325 degree oven for 8-10 minutes, or until golden brown. NOTE: if you smell the nuts that usually means they are burned and it's too late, so set the timer for 7 minutes, take a look and then bake longer if you need to. Just be very careful! Let cool. In a mixing bowl cream butter and sugar until light and fluffy. Beat in eggs and vanilla. In a bowl combine the flour, baking powder, salt, cinnamon, cloves and allspice. Add to the creamed mixture, mixing until blended. Coarsely chop nuts and fold in. Stir in fruit. Divide dough in half. On a greased and floured baking sheet pat out into two logs about 1/2 inches wide and 14 inches long, spacing them at least 2 inches apart. Bake in the middle of the preheated 325 degree oven for 25 minutes or until lightly browned. Transfer from the baking sheet to a rack. Let cool for 5 minutes. Place on a cutting board. With a serrated knife slice diagonally at a 45 degree angle about 1/2 inch thick. Place the slices upright on the baking sheet and return to the oven for 10 minutes longer to dry slightly. Let cool on the rack. Store in a tightly covered container.
Makes about 3 1/2 to 4 dozen (mine never make as much as it says it should)
I didn't cut the Biscotti at the 45 degree angle after the first baking. I should have but I didn't read that part closely when reading the recipe. It would have helped the Biscotti to keep from losing some of the ends if I had done what it said. I got two small baking sheets from this recipe. The next recipe is the Espresso Biscotti

Espresso Biscotti
2/3 cup blanched slivered almonds
3 TBS coffee beans (I had ground coffee but didn't use it)
2 TBS Kahlua or double-strength coffee (I didn't have any Kahlua so I used some instant Espresso powder-I did take 2TBS of the powder and mixed 1 TBS of warm and microwaved the mixture.)
1/2 cup butter
3/4 cup sugar
2 eggs
2 cups plus 2 TBS unbleached or all-purposed flour (I only had the AP flour so I used that)
1 1/2 tsp baking powder
1/4 tsp salt
Place nuts in a shallow pan and bake in a preheated 350 degree oven for 7-8 minutes, or until golden brown. Let cool. Grind coffee beans into a fine powder. Place in a small bowl, add Kahlua or coffee and heat in a preheated 325 degree oven for 5-7 minutes to steep. Or place in a microwave-safe dish, add Kahlua or coffee and microwave on high 10-15 seconds to steep. Set aside. In a mixing bowl cream butter and sugar until light and fluffy. Beat in eggs and ground coffee and liqueur. In a bowl combine flour, baking powder and salt. Add to the creamed mixture, mixing until blended. Fold in the nuts. Divide dough in half. On a greased and floured baking sheet pat out into two logs about 1/2 inch high, 1 1/2 inches wide and 14 inches long, spacing them at least 2 inches apart (they are not kidding about spreading them apart, this recipe blew up like a balloon!). Bake in the middle of a preheated 325 degree oven for 25 minutes or until lightly browned. Transfer from the baking sheet to the rack. Let cool for 5 minutes. Place on a cutting board. With a serrated knife slice diagonally at a 45 degree angle about 1/2 inch thick. Place them sliced upright on the baking sheet 1/2 inch apart and return to the oven for 10 minutes longer to dry slghtly. Let cool on a rack. Store in a tighly covered container.
Makes about 3 1/2-4 dozen (...again, it did not make this much but the turned out HUGE).