The Moveable Feast Food Blog

The Moveable Feast is a Personal Chef Service that serves the Hampton Roads area of Southern Virginia. This blog is an extension of my web site www.themoveablefeastpcs.com and will go into more details about food and any food service industries. Any pictures and or recipes that are published here are all the property of The Moveable Feast unless otherwise noted.

Thursday, October 26, 2006

I found this on a knitting blog that I go to almost everyday and thought I would share this. I thought it was kind of cute.

You Belong in Fall

Intelligent, introspective, and quite expressive at times...
You appreciate the changes in color, climate, and mood that fall brings
Whether you're carving wacky pumpkins or taking long drives, autumn is a favorite time of year for you

Sourdough Banana (minus the nuts) Bread
I am on a roll and just can’t seem to help myself. I am just taken with the sourdough concept because it’s just so easy. I am not a professional baker but I used to work in a bakery while going to culinary school. I think that’s where my sweet tooth and bread tooth got a heck of a work out. I used to make donuts and gradually worked up to preparing the bread for baking. So my fascination with bread is a long standing one. However, the sourdough obsession just started.

Up for experiment number three is a Sourdough Banana Nut Bread (minus the nuts). I made the bread because it seemed pretty easy. I wanted to know if the sourdough sponge would change the taste of the bread. Nope, not in any way! So I am not sure other than it’s a novelty thing, if I would go through the whole process of 3 days for the sourdough starter, then another 12-36 hours for the sponge to take hold and then getting to bake. I have eaten a lot of quick breads, and this one was fine. I have eaten others that have take so much less time that tasted just as good. Would I make it again? You have to ask?


Sourdough Banana Nut Bread
Makes 2 8 1/2X4 1/2 loaves

Sponge
1/2 cup sourdough starter (see this)
1 cup warm water (105-115)
1 1/4 cups unbleached all-purpose flour

For the Bread

2 large eggs, beaten
1 1/2 cups mashed ripe bananas (about 3 bananas)
3/4 cup melted vegetable shortening
1 1/4 cup unbleached all-purpose flour
1 1/2 cups sugar
1 1/2 tsp. baking soda
1 1/2 tsp salt
1 1/2 cups coarsely chopped walnuts

At least 12 hours before baking, combine the starter, flour, and water in a large glass or pottery bowl and mix well. The sponge will have the consistency of cake batter. Cover with plastic wrap and let ripen for at least 12 but not more than 36 hours.

When ready to make bread, preheat the oven to 350F. Grease 2 (8 1/2X4 1/2 inch) pans, four (5X3 1/2 inch) pans, or six (15 ounce) cans. Sprinkle the sides and bottoms of the pans with flour.

Add the eggs, bananas, and shortening to the starter and mix.

In a large bowl, whisk together the flour, sugar, soda and salt until well combined. Add the walnuts and toss to mix.

Add the sponge to the dry ingredients all at once and stir just until mixed, taking care not to over mix. The mixture will be lumpy. Spoon the batter into the prepared pans.

Bake the 8 1/2 loaves for 1-1 1/2 hours; 5-inch loaves for 35 minutes; 15 oz. cans for 25-30 minutes. When done, the loaves will shrink slighly from the sides of the pans and feel springy to the touch. The internal temperature should reach 190F. Cool in the pans for 10 minutes before turning out and completely cooling on a rack.


Note: I know that when I read the recipe I freaked out about the melted vegetable shortening. I used the green can of Crisco. I think that one doesn't have any trans-fatty goo in it. Other than that and leaving out the nuts, I actually followed the recipe the way it was written. The starter came out of the refrigerator and I mixed all the ingredients for the sponge, fed it and put it right back into the refrigerator. I let the sponge it covered with plastic wrap for about 24 hours. It really did bubble like what is described in The Bread Book and was just like pancake batter. If you can stand waiting all the time for the starter to rippen and then the sponge to do it to, the recipe is pretty straight forward.

Sunday, October 22, 2006

Sourdough Pumpkin Swirl Bread
As promised, I am going to show how my Pumpkin Swirl Bread turned out…rather didn’t turn out. Despite the picture shown in the book, I did not understand the directions and went off on my own whim. The bread turned out okay but there were some things that I flat did not understand. As you read the recipe, you will probably get something I didn’t.

I did the Starter and it went very well. If it hadn’t, I wouldn’t have had a clue since it’s been years and years since I have made it. So I went about my happy baking clueless to any failure that might occur. Since I felt like I had done well with the starter I started in on the recipe. I did the mixing and then put the ingredients.

The trouble occurred for me after I followed the rolling out instructions. I looked at the book and just couldn’t understand how you could get rolls from rolling the dough from both ends to meet in the middle and then cut it with scissors. I know it’s hard to visualize while reading. Hey, I had the silly picture in front of me and still did not understand how this was going to work.

So I rolled up the dough from both ends to the middle like the picture showed. It would look like two jelly rolls side by side, if that helps you any. Then I decided that the instructions were beyond me and I cut right down the middle and then made cuts one inch apart to make individual rolls, which is not what I think the author intended but I needed just one more picture to explain it to me and it just flat wasn’t there. So, hence the rolls were a bit drier than they might have been if I had understood and followed the instructions. So here we go:

Sourdough Pumpkin Swirl Bread
Makes 1 loaf (or lots of rolls if you don’t follow the directions)

For the Sponge
½ cup sourdough starter (see the post before this one)
1 cup unbleached all-purpose flour
½ cup warm water (105-115 F)

For the Dough
½ cup warm milk (105-115F)
1 tsp salt
1 tsp ground cinnamon
½ tsp ground ginger
2 ½-3 ½ cups unbleached all-purpose flou
r

For the Filling
1 cup unsweetened canned pureed pumpkin
1 tsp ground cinnamon
1 cup finely chopped pecans
½ cup brown sugar, firmly packed

For the Icing
3 ounces cream cheese, at room temp.
2 cups confectioners’ sugar
2-4 TBS milk


Directions

At least 12 hours in advance, combine the starter, flour, water and sugar in a large glass or pottery bowl and mix well. The sponge will have the consistency of caked batter. Cover with plastic wrap and let ripen for at least 12 hours and not more 36 hours.

When ready to make the dough, add the milk, salt, cinnamon, ginger, and 1 cup of flour to the sponge. Beat vigorously with a dough whisk or heavy-handled spoon for 2 minutes.

Gradually add more of the remaining flour, ¼ cup at a time, until the dough forms a mass and begins to pull away from the side of the bowl. Turn the dough out onto a floured work surface.

Knead, adding more flour, a little at a time as necessary for 8-10 minutes, or until the dough is smooth and elastic and blisters begin to develop on the surface.

Break off 1/3 of the dough and set aside for the filling. Form the remaining dough into a ball and put it into an oiled bowl. Turn to coast the entire ball of dough with oil. Cover with a tightly woven kitchen towel and let rise at room temperature for about 2 hours.

For the filling, add the pumpkin, cinnamon, pecans and brown sugar to the smaller piece of dough. Using your hands, a food processor, or a pastry blender, mix the ingredients with the dough until well combined. This is a messy step. Cover the bowl with plastic wrap and set aside.

When the plain dough has risen, turn it out onto a lightly oiled work surface. Using a rolling pin, roll it into an 11X20 inch rectangle. Spread the pumpkin mixture evenly over the rectangle. Roll one of the shorter edges to the center. Roll the dough from the other short edge to the center. Carefully lift the dough and put it on the parchment-lined or a well-greased baking sheet.

Using long-bladed scissors make cuts along one side of the dough to the center, about 1 inch part, cutting almost all the way to the center. Repeat on the other side. Turn the cut pieces on their sides with the cut side facing up. The cut pieces can be turned in the same direction or turned in alternating directions.

Cover the dough with a towel and let rise for about 1 ½ hours, or until almost doubled in size.

About 15 minutes before the end of the rising, preheat the oven to 375.

Bake the bread for 25-40 minutes, or until golden brown (the internal temperature should be 190F). Remove from the baking sheet and let sit for 20 minutes on a rack.

For the icing, combine the cream cheese and confectioners’ sugar with enough milk to make a spreadable icing. Spread over top of the warm bread.

NOTE: After baking this and re-reading the book several times I know how this is supposed to turn out. It’s supposed to bake a giant loaf, but spread out flattish by cutting the slits in the dough and then pushing them a bit, one against the other. Despite not understand the final instructions, I think my little rolls turned out well. Everyone at worked liked them (except for those who don’t like nuts). I had fun playing with the starter and doing the whole process. I will make this a second time, only following the instructions.

Wednesday, October 18, 2006

For Starters…
I have been really getting attached to my book, The Bread Book by Betsy Oppenneer. I just love this book, because things have turned out pretty well so far. Saturday’s experiment is no different, thankfully.

I haven’t done a Starter in about 25 years. I had one that was for a recipe called, “Friendship Bread”. I got it from my neighbor and baked it as much as we could stand it to eat . The best part of the recipe (as I vaguely can remember) is that you baked the bread in a small coffee can. I just loved the idea of such a cheap vessel making such wonderful bread. The bread was dark and riddled with raisins. Once you cooled it, it was eaten with a nice slather of cream cheese. It might be considered“quick” bread.

Since the weather is dipping into the 60s and 70s, I have the bug to bake. I get this way every fall. So feeling moved by the weather change I decided to bake a recipe from Betsy’s book. I picked the Sourdough Pumpkin Swirl Bread. It was easy to make up, but I did not understand the direction towards the end and I think now after seeing how things turned out, that I REALLY didn’t get it. I do now, so the next time I make this recipe, I am going to try it her way.

So if you have never done a sourdough starter you will find this so easy. I did manage to get this part right!

Yeast Sourdough Starter
By Betsy Oppenneer

1 teaspoon active dry yeast
¾ cup lukewarm water (90-100 degrees F)
1 ½ cups unbleached all-purpose or whole wheat flour

Mix the water and the yeast in a 2-qt glass bowl. Let the yeast “bloom” for 5 minutes.

Add the flour to the softened yeast and stir to combine. Any lumps will disappear during fermentation. Cover loosely with plastic wrap; leave a small opening along one edge or poke 5 or 6 holes with a toothpick. Let stand at room temperature for 3 days. Room temp should be around 65-80 degrees.

The starter will get runny as it begins to work. After 3 days it will have risen and fallen, will be bubbly, and will have a slightly sour aroma. The more you use and maintain a starter, the more pungent it becomes.

Use the starter in any recipe calling for sourdough starter. Use ½ cup of starter to make the sponge for the recipe and the remaining ½ cup to maintain the “mother”. Store, uncovered, in the refrigerator.

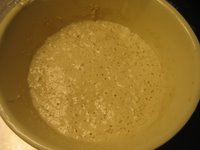
Here is what the starter looks like after 3 days of bubbling on the kitchen counter.


Stay tuned for the Sourdough Pumpkin Swirl Bread in a few days...

Friday, October 13, 2006


Let the Baking Begin
I love fall, winter and spring here in Virginia. I have always been fond of cold weather for several reasons. I love to bake. I really enjoy more hearty foods and I am a sweater and sweats sort of girl. Since we have just now today gotten our first really cool day, I have been baking.

I decided that since my youngest son lives at home again and has such a busy schedule I would use him for an excuse to bake muffins. Poor child lives like his hair is on fire. So to help him at least get a few things that aren't fast food in him, muffins will fit the bill. I can leave them on a plate on the counter for quick exits or freeze them as need be.

I thumbed through The Bread Book by Betsy Oppenneer and found several muffin recipes that I wanted to try. This first one made me curious for two reasons. One is uses no eggs. And two, it uses wheat germ. Now I am not a health food nut, but using wheat germ sounded like a pretty good idea.

This recipe just sounded strange to me and I am happy to say, they tasted pretty good. There was one ingredient that I did leave out because hub doesn't like nuts in his food. So I left the nuts out.


Wheat Germ and Banana Muffins
Makes 12 large muffins

1 1/2 cups all-purpose flour
1 cup wheat germ (you can toast the wheat germ in a non-stick skillet on medium heat and shake or stir in around in the pan until you smell that toasty smell or you can just leave it plain)
1 tsp salt
1 TBS baking powder
1 cup roasted peanuts, chopped
1 1/2 cup buttermilk
1 1/2 cup bananas, mashed (about 3 bananas)
1/2 cup honey
2 TBS vegetable oil (canola will do just as well)

Preheat oven to 375. Grease 12 standard (7 TBS) muffin cups or line with paper liners.
In a large bowl, whisk together the flour, wheat germ, salt, baking powder, baking soda, and peanuts until well mixed.
Combine the buttermilk, bananas, honey, and oil. Stir well, just until combined. Take care not to overmix-the mixture should be slightly lumpy.
Spoon the batter into the prepared cups so that they are 2/3s full. If you want extra-large muffins, fill the cups to the top.
Bake the muffins for 20-25 minutes or until golden brown. Immediately remove the muffins from the pan and serve warm or cool on a rack.


Sunday, October 01, 2006

Good 'Ole Southern Comfort Food
I guess I have been influenced by a site that I stumbled on to last week. It's so hard not to. I just love the things that I read and I feel this person's pain... because I too am a displaced Homesick Texan. The funny thing about all of this is, I tried all my life to run away from there and now I can't wait to go back. It's funny how our youth makes us come to some really life altering decisions that we have to re-visit as adults. I don't regret moving around all my life. I have met some really great people and have eaten regional cuisines that I have grown to love. I think that being a person and a chef, I had to leave myself open to new textures, new tastes and new experiences. I know people who have never left their own home state. They have never eaten anything besides their own local foods. I think it's sad in a way. Never experiencing what the world has to offer is just not right. I don't think that I could appreciate what my roots were until I moved around and tasted what the rest of the world had to offer.

While I love Japanese, Chinese, Italian, and German food but, I still gravitate to what I know and love the most; the taste of home. I was lucky enough to grow up with women who loved to cook and were not pretentious about anything they did in their lives. Mind you these were not rich folks by any stretch of the imagination, but they had a richness in their lives that you can't put a price on. I think my maternial grandmother had the biggest influence on my style of cooking here at home. She did pretty plain and basic food. I loved her food. So when I am feeling stressed or missing home, I think of how her food made me feel. It was warm and comforting. So with the changing seasons and reading Homesick Texan, I had to make a homesick meal.

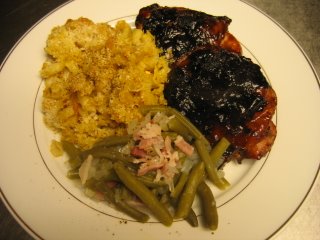
Hubby grilled the chicken thighs and I made macaroni and cheese with over cooked green beans with two strips of bacon and one diced onion. While this is not a glamous meal, it hit the spot. Sometimes, as chefs, I think we over do the layering and making food more complicated that it needs to be to "one-up" someone else. I would be real interested in knowing what someone's best "home cooked" comfort is.

So here is a new Meme. What is your best home cooked comfort food and who inspired it? If you do this "Home Cooked Comfort Food" Meme, please put a link to my site when you do it! Thanks and I look forward to reading what everyone does!